Guide to Hiking the Tower Arch Trail in Arches NP
Looking for a guide on how to hike the Tower Arch trail? Read on for details!

Arches National Park is one of the most visited and famous of the National Parks. Yet, even with all that popularity, there are some hidden gems that few visitors reach. The Tower Arch hike is one of those hidden gem hiking trails in Arches National Park, and boy is it ever worth a little extra effort to get there.
We’ve done all the hikes in Arches National Park and seen all the main arches and think Tower Arch is among the best.
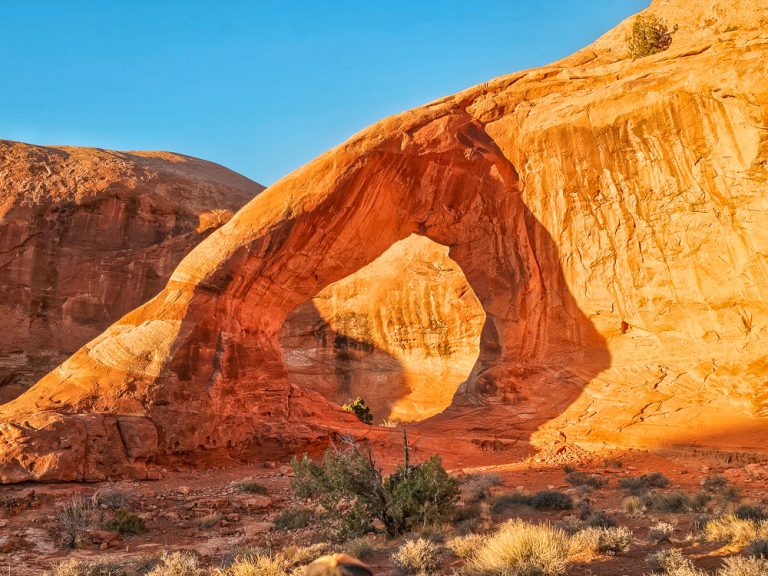
We’re talking fun, scrambling climbs, dramatic red valleys, cool rock formations, sand dunes, and – of course – a stunning arch. Note that Tower Arch is named for the stone “tower” sitting just behind the arch. You can see it rising above the rest of the rocks on the left in the above picture!
In this guide, we’re sharing exactly what its like to do the Tower Arch trail, including how to get to the trailhead, where to park, what the hike is like, and what you’ll see along the way.

Quick Tip: If you’re planning a Utah road trip, I recommend reserving a rental car ASAP for the best prices and availability. I always book my car with this rental car aggregate site to find the best deals.
A Quick Look at Hiking the Tower Arch Trail
- Distance: 2.4 miles, round trip
- Type of hike: Out and back
- Difficulty: Moderately strenuous
- Total Time: 1 hour 30 minutes – about 1 hour hiking and half an hour enjoying the arch/exploring the area. I was going at a pretty good pace on this hike.
- Elevation Gain: 600 feet

How to Get to Tower Arch Trailhead
Tower Arch is in the Northwest corner of Arches National Park, in the Klondike Bluffs section of the park. It is a bit removed from the main area; from the park entrance, it is about a 40 minute drive. From the other destinations in the northern section of the park – such as Devil’s Garden or Skyline Arch – it is a 15-20 minute drive.
To get to the Tower Arch trailhead, you will turn left on Salt Valley Road, which is just before Skyline Arch on the main Arches National Park Road.

The road is definitely accessible by a standard car (I drove a minivan), but it does have some “washboard” sections. You’ll be on this road for 7 miles.

Finally, to reach the trailhead you will need to take a final left turn. However, here you have two options.

The purple arrow shows the main trailhead, which you will go to if you type in “Tower Arch Trailhead” into your navigation. This is, pretty obviously, the parking lot and trailhead I started from. This parking lot is quite a bit farther from Tower Arch.
Alternatively, if you have a study, off-roading 4×4 vehicle, you would be able to turn at Herdina Park Road and drive to the parking lot at the blue arrow. This road is much rougher and not well-maintained, but it does take you to an alternate trailhead that is much closer to the arch, with a much easier hike.
As I parked at the main trailhead off Klondike Bluffs road, the trail from there to Tower Arch is the one I will be describing in the rest of the post.
Starting the Tower Arch Hike
The parking lot features plenty of parking, some informational placards, and vault toilets. The toilets were in good shape and you’ll want to use them if you have any hint of need, as this is a moderately long hike.

The Tower Arch hike begins with a decently steep section. You’ll ascend around 200 feet on an enjoyable rocky trail that feels a bit scrambling. I had a lot of fun on this ¼ mile section, but you can get off trail if you don’t watch for the cairns (stone piles) marking the path. It’s not hard to get back on track, but you’ll have extra scrambling to do so.

Note: Tower Arch is almost completely unshaded, and does feature some steep sections of hiking. If you’re visiting during the summer, I would highly recommend you do this hike in the early morning or later in the evening, not in the middle of the day.
Continuing on the Tower Arch Hike
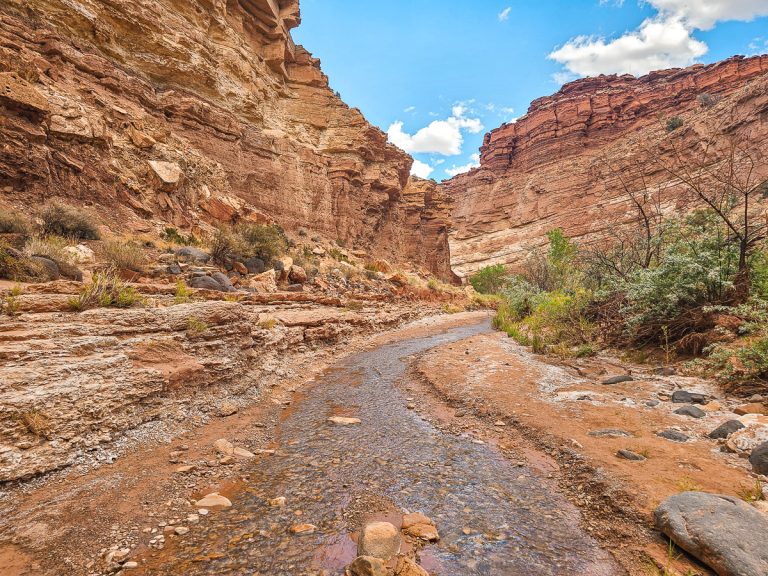
Once you climb this ridge you are rewarded with spectacular views back toward the main area of Arches National Park and with a stunning valley rimmed with intricate red rock formations.

Oh, and you get cell service on this ridge! It’s one of the very few places you get coverage in the whole park.
As you continue hiking to Tower Arch, the next ½ mile or so features a descent into this valley walking on a mix of flat stone and sand. Cairns are again set up to mark the trail for you, but it’s easy to miss them and get off the path, so keep a sharp eye out.
The sandy sections are very distinctive on this part of the Tower Arch hike, as the biological soil crust found throughout Arches National Park makes the sand clump together. This crust serves an important ecological function as it helps retain water for plants and prevent erosion.

If you find you are walking on sand that “breaks” and you leave distinct footprints, you are off trail and damaging the area. The sandy sections that are part of the main trail will be well worn already.
That said, you will see some footprints on the crust throughout the area as you aren’t the first to get lost (and the crust takes a long time to recover.) Just try to step in previous prints to minimize your impact and get back to the main trail.

This was a relaxing, enjoyable section of the hike. It is downhill and offers shifting perspectives of the surrounding rocks. I really liked getting immersed in these formations.

When you reach the low point of the valley, you will cross a sandy stream bed and begin an ascent of a large sand dune. It’s about 100 feet of elevation over 0.2 miles before you reach rocks and more level hiking again. From this ascent to the end is approximately another ½ mile.
At this point, make sure you look to your left to see the Marching Men formation – I thought it was pretty cool.

The final stretch leads you through a narrower passage between rock fins, letting you cool off in some shade as you finish your hike to Tower Arch.
Parallel Arch
As you approach the finish line of the Tower Arch hike, be sure to watch to your right for a bonus arch – Parallel Arch! Parallel Arch is a great example of the beauty that Arches National Park has to offer, and on most hikes it would be the star of the show.

Parallel Arch is a beautiful example of an arch in the process of formation. It features a “pot-hole”(a feature of early arch formation where a hole forms in the ‘roof’ of the rock) and two… well… parallel arches in the process of emerging from the rock.
It is quite arresting and worth taking a minute to admire. But unfortunately for Parallel Arch, it happens to exist right next to Tower Arch and so it gets overshadowed by its cooler older brother.
Sidenote: If you look at Google or Alltrails they do show Parallel Arch on their maps, but in the wrong spot. I am confident that where I was (the red marker) is the correct spot, but Google has it marked a little ways away. (see map below).
I hunted around for 15 minutes in the area they had marked for this “other” Parallel Arch but could not find anything other than some cool rock fins in a curved shape.


Arriving at Tower Arch
Just a bit past Parallel Arch you will find the stunning Tower Arch. The tower itself rises dramatically over this massive arch, and you’ll spot the tower first and it will guide you the last steps. This rock pillar is capped with lighter-colored rock and so it really pops when the sun is shining on it.
Trees and other rock formations give you a shifting view of the arch until you are greeted with a view of its full majesty.

Go up and explore underneath the arch. It looks only moderately sized in your first view, but when you get close you realize just how large it is.

The space behind the arch creates dramatic angles and great views of the tower.

I loved my time here. The Tower Arch made me feel both calm and a little small. The area is absolutely silent, and I enjoyed just sitting and listening to the sounds of my breathing and the few sounds of nature around me. It also offers a great view out to the west – I imagine it would be gorgeous at sunset.

When you’ve had your fill of this beautiful place, simply retrace your steps and enjoy some fresh perspectives of the valley on the hike out. Note that the long valley segment will now be uphill, but I didn’t find it too bad.
Some Practical Information
Hours: Arches National Park is open 24/7/365. You can come into the park day or night to enjoy this beautiful space.
Cost: $30 per private vehicle, valid for 7 days. Or you can purchase an America the Beautiful Pass, commonly known as the National Parks Pass, for $80 for the whole year and gets you into all parks and monuments in the National Parks system. If you’re going to visit even 3 national parks, monuments or forests in a year, it’s definitely worth buying the annual pass!
Timed Entry: Between April 1 and October 31, you will need a timed entry reservation to enter the park between the hours of 7am and 4pm. You can make your timed entry reservations 3 months in advance, here. If you don’t get a reservation, you can enter before 7am or after 4pm.
A few other things to note:
- While you can walk under the arch, it is forbidden to climb or walk on the arches
- No drones are allowed anywhere in Arches National Park
- While pets are allowed on park roads, in parking lots, and in campsites, no pets are allowed on any of the trails in Arches National Park.
What is The Best Month to Visit Arches National Park?
The summer months are by far the busiest in Arches National Park, and temperatures can soar over 100 degrees, regularly. Spring and fall are somewhat less busier (though school breaks are extremely busy), but the weather becomes much more mild and pleasant. Highs in October are in the mid-70’s, and November highs are in the 50’s and 60’s F.
Winter is by far the lowest season in Arches, and even though it’s in southern Utah, it can get fairly chilly, and sometimes gets some snow. Average highs in January are around 40 degrees F.
Always Practice Leave No Trace
Leave No Trace involves packing out waste, not littering, respecting wildlife, not carving into the rocks, etc. Be mindful of what you are doing and respect nature!
Maps
I highly, HIGHLY recommend having some form of offline map downloaded when you visit Arches National Park and do the Tower Arch hike. For remote areas with hiking trails, we usually have downloaded an offline map from Google, as well as a map from Alltrails.
The offline Google map helps us with navigation and driving directions on the roads to the trailhead. Even if you have zero cell service, offline maps will show you your location and give you navigation directions.
We also love using AllTrails when hiking and would highly recommend it! We’ve used it a ton this year, but I would say it was worth the $15 just for our trip to Arches. If you don’t want to use Alltrails, I would again just make sure you have an offline map downloaded of the park.
To download an offline map on Google (in Android):
- Open Maps and have your desired area up on the screen
- Click on your face in the upper right hand corner (to open account options)
- Click on offline maps
- Choose “Select Your Own Map”
- Make sure the selected area includes everywhere you want. For this map, you could zoom to include Arches and Canyonlands in your map and still retain good quality.
- Click download. Now your map is downloaded and will automatically load when you are offline.
Other Places to Visit on Your Trip to Southern Utah
Arches is one of the most popular destinations in southern Utah, and you can’t miss highlights like Delicate Arch, Devil’s Garden, and the Fiery Furnace, but there are a host of other incredible spots to visit nearby as well.
For example, you can swing by nearby Goblin Valley and freely roam through the goblin rock formations, or swing down and spend a day in Capitol Reef National Park, the least visited park in Utah that is massively underrated and has beautiful rock formations.
In the southwestern corner of Utah, Zion National Park is very popular, but Bryce Canyon National Park is maybe my favorite park in Utah and can’t be missed, St George has a host of excellent hiking opportunities, and Snow Canyon State Park is a great hidden gem in Utah. Nearby Valley of Fire State Park and Cathedral Gorge State Park in Nevada have the most stunning scenery.
Grand Staircase-Escalante is a remote area of Utah that has wonders like the stunning Lower Calf Creek Falls and the insanely narrow slot canyons of Peekaboo and Spooky Gulch (which are some of my favorite slot canyons in the southwest).
In the southeastern corner of the state you’ll find gems like Valley of the Gods, Natural Bridges National Monument, and Four Corners Monument, as well as access to nearby attractions like Mesa Verde National Park in Colorado or Lake Powell and Page in Arizona.
Final Thoughts on Hiking the Tower Arch Trail
The Tower Arch hike is truly a hidden gem of Arches National Park. It is an off-the-beaten-path hike that offers absolutely incredible views and a really enjoyable hiking experience. The arch is dramatic, beautiful, and peaceful, and the bonus of Parallel Arch and the Marching Men add a lot to this hike.
I hope this guide has given you a good idea of what to expect and inspired you to visit this unique hike.